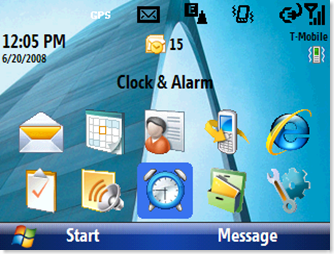
New Klaxon Release

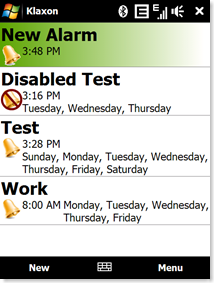
This new version addresses has the following improvements and fixes:

  • Fixed the bug where the alarm would not immediately fire if the device is in "Sleep" mode.
  • Fixed a bug where the screen would not light up when the alarm fired.
  • Introduced a new Audio Delay feature. Klaxon will now try to wake the user using only the back light for the designated time period. If the user does not snooze or turn off the Klaxon, the alarm will then go off.
  • AppToDate support.
  • Implemented the Light Sensor shut off: When the alarm starts, Klaxon samples the ambient light. If the light ever increases beyond a certain range from that ambient light, Klaxon will shut off the alarm automatically.

CeRunAppAtTime, CeSetUserNotificationEx, Connection Manager Process Scheduling and how they are affected by Power States in .NET Compact Framework

After releasing the first version of Klaxon, several users reported that Klaxon was not starting at the designated time if the device was sleeping: often several minutes late, or not at all.

My implementation of process scheduling was using Connection Manager. At first I thought the device going to sleep was disabling all the active connections, so the event would not fire. I switched the implementation to use CeRunAppAtTime, and still encountered the same problem. CeRunAppAtTime is deprecated and there were several blog posts describing the various issues people had with it. I then switched the implementation again; this time to use CeSetUserNotificationEx, which is the new hotness in process scheduling. Still the same issue. I did notice something peculiar however: if I scheduled the event with a System Notification Dialog (like a calendar event), it would work.

In all 3 implementations, Klaxon would launch immediately after the device was turned on. Another oddity was that the Klaxon form loaded was almost instantaneously, when generally it has a 5-6 second when I launch it via the Programs list. This led me to believe that it was actually launched and resident, but the device was then somehow put back into suspension. Turns out I was right. There are a few well hidden forum posts which document this issue.

Basically, if the device is not explicitly set to a "power on" state within a few seconds of going into the "resuming" state, it goes back into a suspended state. So the fix is to call SetSystemPowerState, which looks like the following:

using System;
using WindowsMobile.Utilities;
using System.Collections.Generic;
using System.Windows.Forms;
using System.Threading;
using System.Runtime.InteropServices;

namespace Klaxon
{
    static class Program
    {
        [DllImport("coredll.dll")]
        extern static UInt32 SetSystemPowerState(String pwsSystemState, UInt32 StateFlags, UInt32 Options);
        const UInt32 POWER_STATE_ON = 0x00010000;
        const UInt32 POWER_FORCE = 0x00001000;

        /// <summary>
        /// The main entry point for the application.
        /// </summary>
        [MTAThread]
        static void Main(string[] args)
        {
            SetSystemPowerState(null, POWER_STATE_ON, POWER_FORCE);
            Run(args);
        }

        static void Run(string[] args)
        {
            InteractiveService.Run(args, typeof(AlarmListForm), new ThreadStart(KlaxonService.Run));
        }
    }
}

Note that I am not calling the InteractiveService.Run in the Main method. This is because when Main is called, all types that it references will have their respective assemblies loaded. In my case, this would be System.Windows.Forms, WindowsMobile.Utilities, and a few others. This would add to the "spin up" time and risk the device being put into suspension before SetSystemPowerState is called.

Klaxon: Windows Mobile G-Sensor and Light Sensor Enabled Alarm Clock

klaxon

I mentioned a post ago that I was working on this. Well it's getting close to completion, and wanted to provide people something to give some feedback on. Right now the finishing touches are in the artwork. Beyond the first screen, the buttons and artwork are really ugly!

You can download Klaxon here.

Using Klaxon is pretty straightforward; it's more or less like the standard Clocks and Alarms application.

G-Sensor Instructions:

  • Flip your phone over to snooze.
  • Shake your phone to turn the alarm off.

Not yet implemented:

  • Artwork (I need to create pretty images to use for buttons)
  • Turn off the alarm if the light comes on in the room (using the Light Sensor!)
  • Turn on the phone light for 15 seconds, so you have a chance to turn off the alarm before it goes off.

Playing MP3s and WMAs using the .Net Compact Framework

I've been working on a new project called Klaxon: it's a G-Sensor enabled alarm clock for Windows Mobile phones. One of the features is that it can allow playback of MP3s and WMAs. I initially wrote the application in .NET 3.5 assuming that the new System.Media.SoundPlayer class would support those audio formats. But, they don't! I ended up writing my own class that handles all the Sound related PInvokes:


using System;
using System.Collections.Generic;
using System.Text;
using System.Threading;
using System.Runtime.InteropServices;

namespace WindowsMobile.Utilities
{
    public class SoundPlayer : IDisposable
    {
        [DllImport("aygshell.dll")]
        static extern uint SndOpen(string pszSoundFile, ref IntPtr phSound);

        [DllImport("aygshell.dll")]
        static extern uint SndPlayAsync(IntPtr hSound, uint dwFlags);

        [DllImport("aygshell.dll")]
        static extern uint SndClose(IntPtr hSound);

        [DllImport("aygshell.dll")]
        static extern uint SndStop(int SoundScope, IntPtr hSound);

        [DllImport("aygshell.dll")]
        static extern uint SndPlaySync(string pszSoundFile, uint dwFlags);

        const int SND_SCOPE_PROCESS = 0x1;


        string mySoundLocation = string.Empty;

        public string SoundLocation
        {
            get { return mySoundLocation; }
            set { mySoundLocation = value; }
        }

        IntPtr mySound = IntPtr.Zero;
        Thread myThread = null;
        public void PlayLooping()
        {
            myThread = new Thread(() =>
            {
                while (true)
                {
                    SndPlaySync(mySoundLocation, 0);
                }
            }
            );
            myThread.Start();
        }

        public void Play()
        {
            SndOpen(mySoundLocation, ref mySound);
            SndPlayAsync(mySound, 0);
        }

        public void Stop()
        {
            if (myThread != null)
            {
                SndStop(SND_SCOPE_PROCESS, IntPtr.Zero);
                myThread.Abort();
                myThread = null;
            }
            if (mySound != IntPtr.Zero)
            {
                SndStop(SND_SCOPE_PROCESS, IntPtr.Zero);
                SndClose(mySound);
                mySound = IntPtr.Zero;
            }
        }

        #region IDisposable Members

        public void Dispose()
        {
            Stop();
        }

        #endregion
    }
}

It should work just like System.Media.SoundPlayer.

Omnipresence Beta 1

Finally had a free weekend to work on Omnipresence again. I got a good amount of stuff done:

  • Panning and Zooming do not suspend screen refreshes.
  • Panning the screen does not tax your bandwidth as much. Tuned the compression algorithms to handle it intelligently.
  • Fixed a bug that cause the the screen to "jump" if you panned or zoomed repeatedly.
  • Implemented right click. Click and hold to send a right click.
  • Gave click events tactile feedback: they now vibrate your phone for a split second. This feature can be enabled and disabled in the menu.
  • Implemented several compression techniques. The "best" one is used every frame. Still investigating further tuning of loss-less compression.

Upcoming Features:

  • One of the unmentioned features is that Omnipresence can support multiple clients/viewers at the same time. I need to add a status panel that shows all the current clients on the server.
  • Password based authentication.
  • "Observer" mode. Someone who connects with the specified observer password can only view the session, and not interact.
  • The ability to toggle how double clicks are handled: send to server or client zoom. Right now double clicks are never sent to the server, and that is annoying!
  • Improve on the tactile feedback, by supporting more types.
    • Audio Notification (a customizable beep)
    • Visual Cue (a cross hair that appears where you clicked)
  • Have the client retrieve "larger" than screen dimension images to support faster panning when bandwidth is not an issue.
  • Implement client pacing: the client should intelligently pace its frame requests so it is never waiting for a frame. It should always be either decoding or receiving a frame.

You can download the latest Omnipresence Beta here. Instructions on how to install and use Omnipresence can be found in the original preview post.

Omnipresence Preview

Ok, this is a very early release just for people to check it out. I've mostly been playing around with compression algorithms and investigation of VNC at the moment, so the UI hasn't changed much from the original screen shots. There's a lot of little issues I know about, the primary ones being the inability to unlock a locked machine and being able to click/drag. Anyway, feel free to leave feedback.

Installation:

  1. Verify you have .NET 3.5 installed on your computer.
  2. Verify you have .NET CF 3.5 installed on your device.
  3. Unzip the ZIP file into a directory.
  4. Copy the CAB from the ZIP onto your device and install.
  5. Run Omnipresence.exe on your computer. Start the server.
  6. Run Omnipresence from your device. Type in your IP address/host and hit connect.

Simple instructions:

  • Double tap to zoom in and out
  • Use the HTC Diamond Nav Wheel to smoothly zoom in and out.
  • Drag your finger along the screen to pan.
  • Click and hold to send a right click to the remote machine.
  • You can enter full screen via the menu. You can leave full screen by pressing the center rocker/nav key.
  • I recommend downloading GSen to support screen rotation (I removed it from my app, why do it when someone else does it better?)

Have fun!

Note:

This release only has the Windows Mobile Client and the Windows Server.

Omnipresence, at least that's what I'm calling it. My Windows Mobile Remote Desktop Replacement.

1

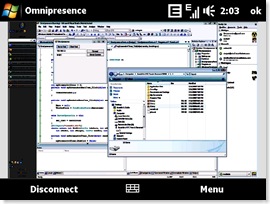
Has been a busy weekend. I've been working on a new Remote Desktop/Device type application that is built with mobile devices in mind. I've written the code such that it works on any platform that supports .NET. All the platform has to do is know how to scrape a screen shot, send a mouse click, and send a key click. This made the Windows and Windows Mobile clients and servers trivial to implement.

I've leveraged some of the cool sensors on the Diamond obviously: changing the device's orientation rotates the target screen to match. And the Nav wheel is used as a zooming function, similar to Opera!

Note/Update: This client does NOT work with Remote Desktop. It is a complete replacement for both the client and the server. It uses a completely different protocol, is a platform independent application (well, theoretically it is since it is written in .NET), and very mobile device friendly.

I realize this may disappoint some, but I have absolutely no desire to reengineer Microsoft's protocol. The current RDP Windows Mobile client has two problems:

  1. The WM6 RDP client is very mobile device unfriendly. You can't zoom, finger pan, and you have no idea where you clicked. On many devices, it does not even work. Microsoft supposedly has no plans to maintain it.
  2. Logging in via Remote Desktop locks your screen. I want to be able to use my phone as a true "remote". For example, managing songs playing on the computer, doing power point presentations, etc. Locking the screen is not what I want to happen in these scenarios.

I did not start writing this with plans to have it be an administration tool in mind. Internally, I've actually been using Omnipresence to connect to an Omnipresence server, and then use Remote Desktop on the server to access any other machine that does not have Omnipresence installed.

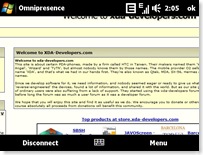
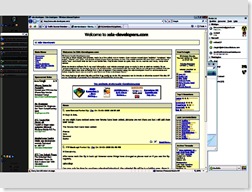
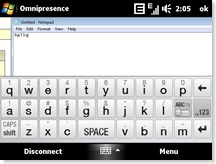
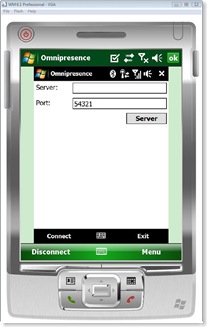
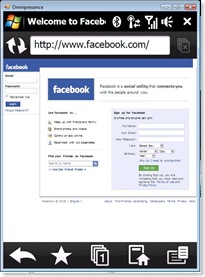
Screen shots for your viewing pleasure:

3

2

Portrait

Landscape

Full Screen

4

omniwm

5

Remote Typing

Emulator connected to HTC Touch Diamond

Full Screen + Zoomed In

omnipresence

Windows Desktop connected to HTC Touch Diamond

HTC Touch Diamond Nav Sensor API

diamondnav

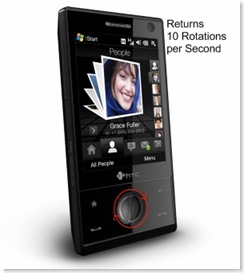
Scott, from scottandmichelle.net, figured out how to detect which way the nav sensor was being moved. I did some further investigation with the data output and managed to figure the rotation per second readings that were also being returned with it.

The new HTCNavSensor has a single event:

Rotated

This event fires whenever the Nav sensor event is detected. The rotation event will provide the user with an approximate rotation per second value and a radial delta. The radial delta is a double value that describes how much the user has moved along the nav sensor since the last time the event was fired. I.e, a radial delta value of .25 would mean that the user moved his finger around a quarter rotation since the last the last time the nav sensor event fired.

As usual, the updated API can be downloaded here. The other sensor APIs (accelerometer and light sensor) are also available in the same zip file. So that wraps up accessing all the different sensors on the HTC Touch Diamond!

Let me know if you find any bugs!

Edit: I found a bug where the nav sensor was reporting clockwise movement when actually moving clockwise. Fixed that. Also updated the Nav Sensor Test to show a red line that rotates as you rotate around the sensor.

HTC Light Sensor API

lightsensor

Goofed around with the HTCSensorSDK.dll some more and figured out how to access the light sensor. I've updated the HTC Accelerometer API to allow access to the light sensor, and converted the values to make it developer friendly. The API exposes the following:

GetLumens

This returns a double value that describes the environmental lumens. It works decent at best, but it's a starting point. I calibrated this using a lightbulb, monitor, and other random light sources around the house I had the lumens values available for.

Brightness

Retrieves an arbitrary enum that describes the brightness of the environment. Values are Dark, Dim, Normal, and Bright.

BrightnessChanged

This event will notify you whenever the brightness changes.

You can download the API here. Let me know if you find any bugs!

Update:

I've updated the SDK to access the Nav sensor as well!

Secrets of the Windows Mobile Home Screen API

homescreen

One of my recent projects at Enterprise Mobile was creating a custom home screen (see above) for the new MotoQ9h and Blackjack II devices. The top row is the standard Windows Mobile "Icon Bar". The second row has the clock, messaging center (SMS, Mail, Voicemail), and current profile. Below that is the status text and the application bar. (Everything below the icon bar is a single full screen plug-in.)

At first glance, I assumed this would be a breeze. I have a powerful layout, key handling, and paint framework that I use in every project I work on, and thought that creating a home screen leveraging that would make it trivial. Sadly I was sorely mistaken.

Those of you familiar with WM Home Screen development know that there are actually two APIs: the Home Screen API (Smartphone) and the Today Screen API (Pocket PC). I was only interested in the prior. Smartphone Home Screen development is considerably more difficult: you don't have nearly as much control. The developer must implement IHomePlugin which only receives paint events (the plug-in is supplied only an HDC) and some key events (left and right only). On Pocket PC, you get an HWND and all the good things that go along with it.

That didn't phase me too much. My plan of action was to implement this IHomePlugin interface in managed code and then let the magic happen. Easy enough. I implement a dummy plug-in in C#, and try to register the COM object... and it doesn't work. It refused to register, the error claiming it was an invalid DLL. I poked at it for a while before finally giving up and checking to see if Google would know why I could not register a C# COM object on Windows Mobile.

I searched for a while, and found plenty of examples of how to invoke unmanaged code from managed code. Then I noticed, not a single site showed how to invoke managed from unmanaged. I began searching explicitly for that, and found my answer:

The .Net Compact Framework does not support hosting the runtime from native code. This means that you will not be able to call CoCreateInstace to instantiate a managed object, or register managed objects as COM objects on the system. You will also not be able to call CorBindToRuntime or ClrCreateManagedInstance. In order to call managed functions from native code, you must first use the runtime to marshal a managed interface or a delegate down to native code. This means you must always start out in managed code (with a .net executable) in order to expose .net components to native code.

This was news to me. And pretty devastating; the thought of creating a fairly complex home screen from scratch in unmanaged code was daunting. If it is not obvious, I'm primarily a .NET developer. Don't get me wrong, I have grass roots in C, but, the facts of life are that the lower level your programming language, the higher the development time and bug count.

So I quickly thought of a workaround though: create a managed service executable that hosts the UI framework. And using a combination of MessageWindows and sharing memory between processes, I could construct a bridge from unmanaged to managed code:

Implement IHomePlugin in unmanaged code and add that plug-in to the home screen. The unmanaged plug-in will do the following:

  1. Create a pool of shared memory.
  2. Create a back buffer HDC. This back buffer is what painted whenever the home screen requests a repaint. The managed code will write to this back buffer across process boundaries.
  3. Whenever the PE_DATACHANGE event is received, invalidate the plug-in.
  4. In the shared memory, write the HDC value, system colors, and plug-in dimensions.
  5. Start my managed executable.

Once started, the managed executable does the following:

  1. Gets the back buffer HDC and other relevant values from the shared memory pool.
  2. Paint to the back buffer HDC.
  3. Notifies the Home Screen API that a plug-in has had a data change event using SHOnPluginDataChange. This in turn causes the plug-in to invalidate and repaint from the back buffer.

That solves the painting issue, but the plug-in still needed to get key events from the Home Screen API and deliver them to managed code. Easy enough: the managed executable can create a MessageWindow and the unmanaged can deliver the key events provided by the Home Screen API. The managed code can then process the key event, repaint the back buffer, and invalidate the plug-in to refresh the screen.

This works great, but the catch with the API is that it delivers only left and right key presses. It won't send up and down key events (because then the user can't navigate to another plug-in on the home screen). However, since my plug-in was full screen, I did not matter. I needed a way to navigate vertically between elements laid out in my single full screen plug-in.

The solution to capturing all key events is a neat trick that native Win32 API developers are familiar with. Have the unmanaged plug-in subclass the home screen window (DesktopExplorerWindow as found in the VS Remote Spy++ tool) proc to steal the key presses and send them off to the managed code.

And there you go, a fully functional "managed" Home Screen Plug-In. My initial worry was that performance would suffer terribly from the cross process communication, but the home screen was actually very responsive. Users reported that the UI was quite "snappy".

Unfortunately I don't have any sample code to provide (yet), since this is all company IP. But maybe it will be released in the future!

Note: I should mention that Home Screen development actually gets easier with this interprocess communication. Developing a purely unmanaged plug-in means that the entire home.exe process needs to be stopped and started with every little change made to the plug-in. This can grow to be quite tedious. With the two-process model, starting and stopping the second managed process leaves the home.exe undisturbed.
Virtual Earth and Google Maps Tile Server Client for .NET (and Compact Framework)

If you've ever used Live Search, you probably agree that it is hands down the best local search program available for Windows Mobile. It got me curious as to how the maps are rendered so smoothly. A quick investigation made me stumble upon Via Virtual Earth, which explained how to roll a tile server and a corresponding tile client.

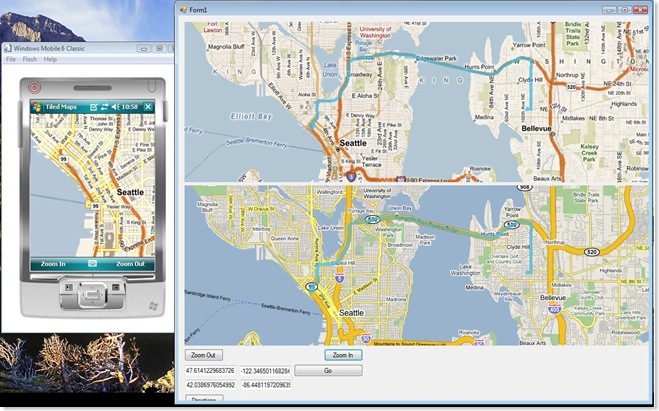
I ended up coding a Tile Server client in C# that is compatible with Virtual Earth and Google Maps. This includes the satellite, terrain, traffic, and other such tiles. Here are the grand results:

tiledmaps

On the left, you see a simple client running Virtual Earth on Windows Mobile. Top right, you see the client running on Windows. Below that, you see that same program running Google Maps. Both clients are also displaying the directions from where I live (Seattle) to where I work (Bellevue).

These two programs are just test harnesses, and don't even demonstrate all of capabilities of the tile client. Features include:


    • Blending multiple tile sources (such as maps + traffic, or satellite + traffic)
    • Push pin images
    • Retrieval of directions from both Virtual Earth and Google Maps: the text and an array of geocodes that is used by the client to draw the path
    • Cell Tower geocoding

Sadly I can't release the fully featured map controls that I created that harness all the features, because that would infringe on company IP. However, I can release the full source to the tile and directions clients.

The client makes it trivial to draw a smooth scrolling map. You just instantiate it and tell it to draw on a Graphics object. From there, you can pan, zoom, etc. The client does everything asynchronously: it calls a handler you provide whenever a new tile has completed downloading. The following is the entirety of the Windows Mobile client test harness code:


VirtualEarthMapSession mySession = new VirtualEarthMapSession();
protected override void OnPaint(PaintEventArgs e)
{
base.OnPaint(e);
mySession.DrawMap(e.Graphics, 0, 0, ClientSize.Width, ClientSize.Height, (o) =>
{
Invoke(new EventHandler((sender, args) =>
{
Invalidate();
}));
}, null);
}

Point myLastPos = Point.Empty;
protected override void OnMouseMove(MouseEventArgs e)
{
mySession.Pan(MousePosition.X - myLastPos.X, MousePosition.Y - myLastPos.Y);
myLastPos = MousePosition;
Invalidate();
base.OnMouseMove(e);
}

protected override void OnMouseDown(MouseEventArgs e)
{
myLastPos = MousePosition;
}

private void myZoomInMenuItem_Click(object sender, EventArgs e)
{
mySession.ZoomIn();
Invalidate();
}

private void myZoomOutMenuItem_Click(object sender, EventArgs e)
{
mySession.ZoomOut();
Invalidate();
}


Note:

This code is really old. I had to update a few of the URLs to the tile servers prior to publishing the code so that it would work. Google tends to change their URL schema relatively often, usually its just a version number in the query string or something. In addition, it looks like the format of the HTML that Google returns for text directions is no longer the same, and consequently client fails when parsing it now. An enterprising developer other than myself would need to figure out how to parse the new HTML format and update the code. However, the rest of it seems to be working (including Virtual Earth directions).

Additionally, I did not create clients for the geocoding services provided by Google Maps nor Virtual Earth, seeing as though my former company had their own. That shouldn't be too difficult, Google has a free REST based geocoding service, and so does Yahoo, MapQuest, and others I believe.

Also, I would have done all the downloading using the anonymous methods technique I described below, but anonymous methods were not available yet. :(

Fun With Anonymous Methods

A few months ago I wrote some code that really made me appreciate the new language feature in C#: Anonymous Methods. I decided to turn it into a sample application that creates a web request to www.google.com and downloads it when you push a button... asynchronously (that means the UI does not hang while the application is downloading). Prior to C# 2.0, doing a web request and download the content asynchronously was several hundred lines of sloppy spaghetti code: you need to implement callbacks, cleanup, error handling, state maintenance, etc. A lot of developers, myself included, would “cheat” and wrap synchronous calls in a thread to fake asynchronous requests (this is not ideal for performance).

The beauty of anonymous methods is that the compiler’s syntactic sugar handles a lot of the aforementioned for the developer very elegantly in the background.

Here’s what a fully asynchronous download looks like now, with error handling and cleanup and all (5 anonymous methods in total):

HttpWebRequest req = WebRequest.Create("http://www.google.com") as HttpWebRequest;
MemoryStream memStream = new MemoryStream();
HttpWebResponse resp = null;

// anonymous method to handle cleanup
EventHandler Cleanup = (s, ev) =>
    {
        using (resp)
        {
        }
        resp = null;
        using (memStream)
        {
        }
        memStream = null;
    };

// anonymous method to handle errors
EventHandler Error = (s, ev) =>
{
    MessageBox.Show((s as Exception).Message);
    Cleanup(null, null);
};

req.BeginGetResponse(responseResult =>
    { // anonymous method that waits for a response from the web server
        Thread.Sleep(1000); // for asynchronous testing
        try
        {
            resp = req.EndGetResponse(responseResult) as HttpWebResponse;
            Stream responseStream = resp.GetResponseStream();
            byte[] buffer = new byte[1024];
            AsyncCallback rc = null;
            rc = readResult =>
                { // anonymous method that waits to read a some data from the web server
                    Thread.Sleep(1000); // for asynchronous testing
                    try
                    {
                        int read = responseStream.EndRead(readResult);
                        if (read > 0)
                        {
                            memStream.Write(buffer, 0, read);
                            responseStream.BeginRead(buffer, 0, buffer.Length, rc, null);
                        }
                        else
                        {
                            // We finished downloading! Invoke the UI thread to print the data!

                            // anonymous method to handle completion
                            EventHandler Done = (s, ev) =>
                            {
                                memStream.Seek(0, SeekOrigin.Begin);
                                string blob = new StreamReader(memStream).ReadToEnd();
                                Cleanup(null, null);
                                MessageBox.Show(blob);
                            };

                            Invoke(Done);
                        }
                    }
                    catch (Exception ex)
                    {
                        Invoke(Error, ex);
                    }
                };
            responseStream.BeginRead(buffer, 0, buffer.Length, rc, null);
        }
        catch (Exception ex)
        {
            Invoke(Error, ex);
        }
    },
    null);

Automating Build Versioning and Publishing of Smart Device Projects with Team Foundation Build

A few months ago I sent out an email describing the process of setting up the Team Foundation Build System to play nicely with Smart Device Projects. This mail included: setting up the build machine to work with Smart Device Projects, account permissions, publish location, versioning, and also a workaround to making Smart Device CAB projects buildable by TFS. I’m sure other developers have had to or will have to go through the same pains of figuring this out, so I decided to publish it a la blog.

I hit 3 snags while working on this:

  1. Build Service Setup and Permissions
  2. Automatic versioning in the standard Major.Minor.Build.Revision style
  3. Smart Device CAB files are not supported by MSBuild

Build Service Setup and Permissions

  1. Set up Team Build on the Build machine (BuildMachine)
    1. Install Team Build
    2. Install Visual Studio 2008 on the machine as well, otherwise Compact Framework projects will not compile.
    3. Install the Windows Mobile 6 Professional and Standard SDKs, Visual Studio 2008 only ships with Windows Mobile 5 SDKs.
  2. Make sure the Build Service account (TFSBuild) has full access and permissions to the share you are publishing (\\PublishMachine\Builds\...).
  3. Create a Build Agent (only needs to be done once per server, and then is accessible to everyone). In Visual Studio, click Build, and type the server name (BuildMachine).
  4. Create a Build Definition for your project
    1. In Team Explorer, under Builds, create a new Build definition. The wizard is very straightforward. Choose a location in the source tree, and choose a build configuration (Release). This will create a tfsbuild.proj file in the location you specified in the source tree. You will need to edit this file later on.
    2. Right click the build definition and perform a build. Verify it succeeded. You will notice that the build number is Ole Automation dated. Not very easy on the eyes.

Automatic Versioning

Microsoft has some generic MSBuild tasks available that can be used to handle this. They are a separate download from Visual Studio however. Here’s the relevant links:

  1. Setting up your Solution
    1. Add the Microsoft.Sdc.Common.tasks and Microsoft.Sdc.Tasks.dll to the root of your solution. Using the ones provided by Microsoft actually caused me build errors for whatever reason. Some of the tasks they included were the cause. I have commented out all the tasks but those necessary to accomplish versioning. I have attached the .dll and the edited .tasks file to this blog.
  2. Preparing the Version.xml File
    1. I have attached a sample Version.xml to this blog. Save this to a network share (preferably the same as the one being used when the Build definition was created). The task will reference this file to retrieve the current version, increment it, and save the new version back to the file.
    2. The build service account (TFSBuild) needs to have full permissions to this file. This file must not be read only.
  3. Modifying the TFSBuild.proj
    1. Check the tfsbuild.proj file out for edit
    2. Add the following XML blob before the ending </Project> tag:
    3. <!-- This will retrieve and increment a version number from a file on a network share -->
      <Import Project="$(MSBuildProjectDirectory)\Microsoft.Sdc.Common.tasks" />
      <Target Name="BuildNumberOverrideTarget">
        <!-- Now update the version number -->
        <VersionNumber.Update VersionNumberConfigFileLocation="\\emsea100\Products\Blackberry Home Screen\Version.xml"
                              SkipSourceControl="true"
                              OnlyIncrementRevision="true">
          <Output TaskParameter="VersionNumber" PropertyName="BuildNumber" />
        </VersionNumber.Update>
      </Target>
      
      <!-- This will replace all version numbers in the assemblyinfo.cs files with the one from the share -->
      <!-- This target is called after Team build gets all the source files from TFS. -->
      <Target Name="AfterGet" DependsOnTargets="VersionAssemblies" />
      
      <Target Name="VersionAssemblies">
        <!-- Get the Assembly Info files.-->
        <CreateItem Include="$(SolutionRoot)\**\AssemblyInfo.cs;">
          <Output TaskParameter="Include" ItemName="AssemblyInfos"/>
        </CreateItem>
      
        <!-- Update the version numbers -->
        <File.Replace Force="true" Path="%(AssemblyInfos.FullPath)" NewValue="AssemblyVersion(&quot;$(BuildNumber)&quot;)" regularExpression="AssemblyVersion\(\&quot;(\d+.\d+.\d+.\d+)\&quot;\)" ignoreCase="true" />
      </Target>
    4. Edit the VersionNumberConfigFileLocation value to be configured for your publish machine and directory. You can also change the OnlyIncrementRevision to false so that the build number also gets autoincremented.

Building a Smart Device CAB Project Using MSBuild

There is no “good” way to do this. I did this by creating a standard Smart Device CAB project, and then building it on my development machine. If your project is called SmartDeviceCab, in the SmartDeviceCab\Debug folder, there is a SmartDeviceCab.inf file. That file can be used as input to CabWiz.exe to create the file from a command prompt. I will be using the INF file of our recently released tool, Device IP Utility, as an example.

  1. Solution Setup
    1. Copy the EMIPUtil.inf file to the solution root folder.
    2. Right click the solution and add existing file: %SolutionRoot%\ EMIPUtil.inf
  2. Modifying the INF file
    1. The INF file will contain a section of absolute paths to the location of the binaries on the development machine. This needs to be changed to absolute paths on the build machine. Note that all the binaries on the build machine will be dumped into the same directory, making it relative easy to edit. The first INF file shows what the file may look on your development machine, and the second will show how it should look on your build server.
      1. Old Paths Local to Your Developement Machine

        1=,”Common1″,,”C:\Users\kdutta\Documents\Visual Studio 2008\Projects\Device IP Utility\Device IP Utility - Production\EnterpriseMobile.WindowsMobile.IPUtil\bin\Release\”
        2=,”Common2″,,”C:\Users\kdutta\Documents\Visual Studio 2008\Projects\Device IP Utility\Device IP Utility - Production\EnterpriseMobile.WindowsMobile.IPUtil\obj\Release\”
        3=,”Common3″,,”C:\Users\kdutta\Documents\Visual Studio 2008\Projects\Device IP Utility\Device IP Utility - Production\EnterpriseMobile.WindowsMobile.Utilities\bin\Release\”
        4=,”Common4″,,”C:\Users\kdutta\Documents\Visual Studio 2008\Projects\Device IP Utility\Device IP Utility - Production\EnterpriseMobile.WindowsMobile.Utilities\obj\Release\”
        5=,”Common5″,,”C:\Users\kdutta\Documents\Visual Studio 2008\Projects\Device IP Utility\Device IP Utility - Production\WMIPUtil\obj\Release\”
        6=,”Common6″,,”C:\Users\kdutta\Documents\Visual Studio 2008\Projects\Device IP Utility\Device IP Utility - Production\WindowlessControls\bin\Release\”
        7=,”Common7″,,”C:\Users\kdutta\Documents\Visual Studio 2008\Projects\Device IP Utility\Device IP Utility - Production\WindowlessControls\obj\Release\”
        8=,”Common8″,,”c:\Users\kdutta\Documents\Visual Studio 2008\Projects\Device IP Utility\Device IP Utility - Production\EnterpriseMobile.WindowsMobile.IPUtil.Interop\Windows Mobile 5.0 Smartphone SDK (ARMV4I)\Release\”

      2. New Paths on Build Machine

        1=,”Common2″,,”C:\Documents and Settings\TFSBuild\Local Settings\Temp\Device IP Utility\Device IP Utility - Production\Binaries\Release\”
        2=,”Common3″,,”C:\Documents and Settings\TFSBuild\Local Settings\Temp\Device IP Utility\Device IP Utility - Production\Binaries\Release\”
        3=,”Common4″,,”C:\Documents and Settings\TFSBuild\Local Settings\Temp\Device IP Utility\Device IP Utility - Production\Binaries\Release\”
        4=,”Common5″,,”C:\Documents and Settings\TFSBuild\Local Settings\Temp\Device IP Utility\Device IP Utility - Production\Binaries\Release\”
        5=,”Common6″,,”C:\Documents and Settings\TFSBuild\Local Settings\Temp\Device IP Utility\Device IP Utility - Production\Binaries\Release\”
        6=,”Common7″,,”C:\Documents and Settings\TFSBuild\Local Settings\Temp\Device IP Utility\Device IP Utility - Production\Binaries\Release\”
        7=,”Common8″,,”C:\Documents and Settings\TFSBuild\Local Settings\Temp\Device IP Utility\Device IP Utility - Production\Binaries\Release\”
        8=,”Common9″,,”C:\Documents and Settings\TFSBuild\Local Settings\Temp\Device IP Utility\Device IP Utility - Production\Binaries\Release\”

  3. Making MSBuild call CabWiz.exe
    1. Check out and edit the tfsbuild.proj file
    2. Before the ending </Project> tag, insert the following:
        <!-- This will build a CAB file from an .inf file -->
        <Target Name="BeforeDropBuild" DependsOnTargets="MakeCAB"/>
        <Target Name="MakeCAB">
          <Message Text="Building a CAB file" Importance="normal"/>
          <Exec Command="&quot;C:\Program Files\Microsoft Visual Studio 9.0\SmartDevices\SDK\SDKTools\cabwiz.exe&quot; &quot;C:\Documents and Settings\TFSBuild\Local Settings\Temp\Device IP Utility\Device IP Utility - Production\Sources\EMIPUtil.inf&quot; /compress /dest &quot;C:\Documents and Settings\TFSBuild\Local Settings\Temp\Device IP Utility\Device IP Utility - Production\Binaries&quot;"/>
        </Target>
      
    3. Modify the following Command Attribute to be set up specifically for your build machine. This defines the path to CabWiz.exe, the path to your INF file, and the output directory of the CAB file.
    4. This XML insert calls the CabWiz.exe prior to publishing the binaries. CabWiz.exe adds the CAB file to the binaries folder, which in turn gets published with everything else.

Sadly there is somewhat poor support for Smart Device Projects in TFSBuild, so making it work isn’t exactly elegant, but it works!

VC Project Template for Smart Device CE Setup DLLs

It's pretty annoying to have to create a CE Setup DLL cpp and def file every time I make a new CAB. So I finally got around to creating a VC Template to handle that for me. You can download it here.

Sadly, I did not create an installer for this template.

Installation instructions (adjust your installation directory accordingly):

  1. Unzip the contents onto your drive.
  2. Copy CESetupDLL.ico, CESetupDLL.vsdir, and CESetupDLL.vsz to C:\Program Files (x86)\Microsoft Visual Studio 9.0\VC\vcprojects\smartdevice
  3. Copy the Scripts and Templates folders into C:\Program Files (x86)\Microsoft Visual Studio 9.0\VC\VCWizards\SmartDeviceAppWiz\CESetupDLL
  4. Edit CESetupDLL.vsz and edit the ABSOLUTE_PATH value to whatever you supplied in Step 3.

And that should do it! You will now find the new project template in Visual Studio under the Smart Device folder in Visual C++.

Using HTC Touch Diamond's Accelerometer/Sensor SDK from Managed Code

When I first got my HTC Touch Diamond a while ago, one of the first things I tried to do was reverse engineer the Sensor API found in HTCSensorSDK.dll. However, anyone who has tried to reverse engineer DLL arguments knows how tedious and painful it can be to create a dummy DLL to intercept valid arguments, parse through assembly, and inspect random memory pointers. Luckily, I did discover a registry key: HKEY_LOCAL_MACHINE\Software\HTC\HTCSensor\GSensor\EventChanged which let me figure out what the general orientation of the device was; and that was good enough for what I was trying to do.

However Scott, from scottandmichelle.net, successfully reverse engineered the HTCSensorSDK.dll. This allows developers to use the g-sensor that is available on the device. Very impressive work on the part of Scott!

Anyhow, I spent a portion of today writing a managed wrapper for HTC's Sensor API. You can download it here. The code also includes a sample Teeter-esque type application which allows you to roll a ball around the screen.

The managed API contains the IGSensor interface which allows you to hook to query the state of the g-sensor on the device. You can create it using the GSensorFactory.CreateGSensor method. It exposes the following methods, properties, and events:

GetGVector

Returns a vector that desribes the direction of gravity/acceleration in relation to the device screen.
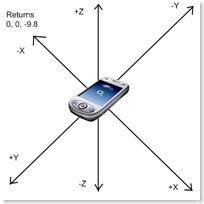
When the device is face up on a flat surface, this method would return 0, 0, -9.8.
The Z value of -9.8 would mean that the acceleration in the opposite direction of the orientation of the screen.
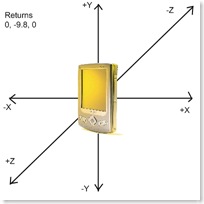
When the device is held standing up, this method would return 0, -9.8, 0.
The Y value of -9.8 would mean that the device is accelerating in the direction of the bottom of the screen.
Conversely, if the device is held upside down, this method would return 0, 9.8, 0.
The vector returned will have a length measured in the unit meters per second square.
Ideally the when the device is in a motionless state, the vector would be of length 9.8 (the gravitational constant). However, the sensor is not extremely accurate, so this almost never the case.

faceup portrait

Orientation

Retrieves the current orientation of the device, returning one of the following enums: Landscape, ReverseLandscape, Portrait, ReversePortrait, FaceDown, FaceUp.

OrientationChanged

This event fires whenever the device's orientation changes.

Enjoy, and let me know if you find any bugs!


Update:

I have updated the SDK to include the Nav Sensor and the Light Sensor. All the sensors are now accessible!

Update #2:

The GSensor API now supports the Samsung Instinct/Omnia!

First Post!

Sorry, I had to.