GVoice 1.2 Push Setup with GVMax

Go to http://www.gvmax.com and create an account with your Google login credentials.

After that is complete, click the “Active Monitors” button.

GVMax-1-1-1

Then check “Send Http Post notifications” and enter the following into the following into the POST Urls:

https://wp7voice.appspot.com/gvmax

GVMax-2-1


That’s it!

Windows Phone Marketplace Woes

I wrote this letter to the director in charge of developer programs at Microsoft:

Hi Brandon, I got your contact information from Loke Uei Tan, who I've worked with extensively in the past. To introduce myself, I'm Koushik Dutta, a former Device MVP (2008-2009). I dropped out of the WinMo scene around 2008 to begin working on Android and iPhone instead. I have started dabbling in Windows Phone again in since its release.
Mobile app development is my passion and now my full time, self-employed, profession; I have several apps on the Android Market with millions of users.

I am very pleased with the platform as a whole; it has exceeded my expectations in terms of ease of development. A solid V1 product all around, and I am looking forward to future releases that will help round out the platform (ringtones, background processes, inter-app communication).

However, I must say, the Market approval process is a blemish on the platform. And it will have a significant impact on how I will design apps in the future.
I released a Google Voice client (GVoice) on the market a few weeks ago. It took 14 days to get it onto the market, due to a variety of reasons and failures.

  • First failure was due to the back button exiting the app when a non full screen popup was shown.
    • It took 4 days to get this response.
  • Second failure was due to a phone in airplane mode crashing when attempting to setup push.
    • Ok, pretty obscure, but good to know.
    • Took around 4 days to get this response.
  • Third failure was due to Push not being allowed to be turned on by default on, without user confirmation. This is really quite strange.
    • For one, the app is useless without push.
    • Secondly, what are the point of the WMAppManifest.xml capabilities/permissions, if not to explicitly tell the user up front that push would be used? That's what Android does.
    • Thirdly, why is the confirmation task offloaded onto the developer? Why not make a dialog pop up at the system level (similar to iPhone) that lets the user confirm the usage of push?
    • It took 4 days to get this response.
  • Fourth submission: Success! App was released.

I am now trying to release a new version; which was submitted a week ago (11 days if you include the test failure). Its status is still "Testing in Progress". In that same 7 day period, a competitor app, has had two releases.

  • What priority are submissions given? First come first serve? Do resubmissions on failed apps get priority?
  • Why reject the app altogether for obscure bugs? Ie, rejecting a submission for an app that requires connectivity and crashes in airplane mode in specific scenarios. Seems it would be wiser to just note that in the application, approve it, and let the developer address it in a future release. Entirely too much churn is happening here.
  • How does a developer make an emergency release?
    • Currently I am parsing HTML and JSON from a third party web page. If that page format changes, the app stops working, period. I would need to update it immediately.
    • Unfortunately, a 7 day turnaround time is glacial by Android standards (where approvals are instant). An app being broken for that long in lieu of waiting for Market approval is unacceptable and will cost a developer in users and reviews.
    • If this is expected to be the norm, I will need to redesign my application by offloading all parsing onto my own server (infrastructure costs money), to gaurantee reliability and quick fixes.

I would love to hear your thoughts on this.

Thanks,
Koush

Edit: Regarding approving apps with bugs:

Bugs happen. If the bug is low risk, low occurrence, and generally not an issue during normal user usage: Don’t delay the application release by another 4 days by rejecting the app. Obviously highly visible crash bugs or UX issues should be rejected.

Update:

I finally got an update regarding why the GVoice update has not been approved yet:

Hello Koushik,
 
My apologies for the confusion regarding your app since you resubmitted it. The app should have completed testing by now of course so it most likley has become Stuck in Workflow. This means that something in the testing process stopped and the app will need to be resubmitted for testing. Again, I apologize for this inconvenience but it is the only way to resolve this right now.
 
Best Regards,
Ben
The Windows Phone Marketplace Support Team

TLDR version: Something messed up on our end. My bad. Resubmit and we’ll try again. My response:

Uh... you know you can't submit another version of your app with the same language while a submission is in progress?

The Marketplace Support Team needs to resolve this. I can't do another submission from my end...

Another update from Brandon:

Hello Koushik,
 
I apologize for the delay in getting back to you but due to the volume of issues we are handling, it will take a day or two for us to get back to you. Also, we do not have a contact number so we cannot assist other than through this medium. Please understand that additional support and answers can be found in the App Hub Forums as well as they are monitored by Microsoft Evangelists, MVPs and Engineers.
 
Again, I apologize for the trouble you are having submitting the app. The workaround to submit your app is to submit it as a new project instead of an update. You may have to choose a new name for the project in Step 1 to complete this. We are still working with the Certification Team to see if they can remove the app from workflow but o resolution has been provided yet. As soon as I do hear something I will let you know.
 
Best Regards,
Ben
The Windows Phone Marketplace Support Team

I already have people that have purchased the app. How do I give them updates?

Furthermore, if I release another version of the app under a new name, I'll end up having two paid userbases and will need to update TWO apps instead of just one. This is NOT an acceptable workaround.

Koush

Hello Koushik,
 
After working with my support team, we cannot find any app submission after12/7 when GVoice failed testing. Since the site is not allowing you to submit the update, please follow these steps to submit the app and ensure customers receive the update.
 
Create a new project in the App Certification Dashboard
In Step 1, use a new name for the project
In Step 2, use the actual app's name that it will be published under
Continue through the entire process, including the loading of the XAP file and images to get the app into testing.
 
This should work but if you run into any errors, please provide screenshots starting from when you log into the site until you reach the error.
 
Best Regards,
Ben
The Windows Phone Marketplace Support Team

Ben, I have submitted GVoice under the name "GVoice." but with the same Application Title. I hope that users of the "GVoice" app which have already paid are able to upgrade to this new version.

Koush

At this point, I can’t tell if Brandon is trying to be really nice, or just messing with me. Guess we’ll find out. I’ll give him the benefit of the doubt, since he hasn’t chewed me out for being my usual boorish self. So, let’s hope this all works out!

Update: Microsoft really was not prepared. I am apparently the victim of a major “workflow” bug that needs to be manually resolved:

Ben, I have submitted GVoice under the name "GVoice." but with the same Application Title. I hope that users of the "GVoice" app which have already paid are able to upgrade to this new version.

Koush

Hello Koushik,
 
Thank you for resubmitting the app. I do want to add that when submitting the app for testing, as long as you change the name in Step 1 (it can be any name, or even a variation like GVoice 1, 2, etc), Step 2 can remain GVoice. As long as the components in the XAP are similar, there should be no reason for a new app is created. I am requesting my Certification Team to provide more technical details that will explain this further, and if I get a response I will let you know.
 
Best Regards,
Ben
The Windows Phone Marketplace Support Team

Thanks Ben. The whole submission process is very opaque to a developer. The submission process makes it feel like unless you use the "Add Additional Submission" option in the existing submission, it will create a new instance of an application on the market. This is good to know.

Koush

Hello Koushik,
 
I just exited a conference call with the Certification Team and one of the topics was the issue you are experiencing. In short, the steps I provided, which came from the Certification Team until this meeting, were a workaround. Unfortunately, they do not allow for the app to be updated.
 
The Certification Team has acknowledged that apps Stuck in Workflow, as yours is, must be manually repaired by their team. I am putting in a request to get GVoice repaired ASAP, though the process is taking several business days for expedited requests and 2 weeks for all others.
 
What this means is that the newest submission I had you do will not resolve the issue and I must have the Certification Team get your updated app tested and certified. Please allow me to work with them to get this resolved and I apologize for the time this is taking from you. I will provide updates as soon as possible.
 
Best Regards,
Ben
The Windows Phone Marketplace Support Team

GVoice 1.2 Update

GVoice 1.1 isn’t even out yet (still waiting for Microsoft), but I figured I’d prepare an update the page with what’s waiting in the pipeline for users:

  • Switched to using the standard “tilt” animation found in Windows Phone lists.
  • Voicemail playback highlights the transcript word by word, as seen in the Google Voice web interface.
  • Mark as Unread
  • Search is snappier
  • You no longer have to enter a number during login; instead, a list of all valid phones linked to the account is shown.
  • Fixed issue with texts and voicemails being accidentally clicked too easily when scrolling.

GVoice 1.1 Update

SplashScreenImage

Well, GVoice finally got Market approved; and just in time too, since I had a boat load of updates waiting!

Changelog in the coming 1.1 update (waiting for Market approval… again):

  • Push is available to trial version users (ads enabled)
  • Push notifications are now sent for voicemail
  • Search Conversations
  • Call Log
  • Added keyboard auto completion
  • Outgoing calls now open a call screen
  • Fixed potential application startup crash
  • Contact photo downloads are more reliable
  • Progress indicator now has a textual description
  • Conversations can be deleted
  • Google Voice can be dialed via the application menu
  • Direct/PIN Dial is available via the settings menu
  • Fixed conversation sort order

Push Notification Setup for GVoice on Windows Phone 7

Have GVoice 1.2 or later? Please click here for really easy instructions!

First of all, thanks for using GVoice! I hope you enjoy the application!

Overview of How Push on GVoice works:

Push is done on GVoice by forwarding a copy of all your text and voicemail emails to the GVoice servers. The GVoice server will then notify your phone of the new message. (Privacy is important. So the message is never stored on the server, once it’s received, it is immediately sent to the GVoice phone app and no log or copy is saved.)

First, to receive push notifications on your phone, put GVoice onto your Home Screen.

IMG_20101119_185422

Verify that you have push enabled in GVoice’s Push Settings menu. It is not on by default (due to Microsoft’s developer guidelines).

To test that the application can properly receive push, click the following links to send push notifications to your phone:

If the previous test worked, let’s set up your Google Voice account to send notifications to your phone through the GVoice service!

To set up your mail and voice account for GVoice, first let's open your Google Voice account and set up your forwarding settings:

1-GoogleVoiceSettings


2-GoogleVoiceWindowsPhoneEdit

Disable SMS forwarding to your phone, or you’ll get two copies of the SMS and two push notifications: One that shows up for the regular Messaging app and one shows up for GVoice.

3-GoogleVoiceWindowsPhone


Now, forward your texts and voicemails to your email address. Also disable Voicemail Text notifications.

4-GoogleVoiceTextAndVoicemail


Now, all your messages are being sent to your email. Let’s set up your email to forward them to the GVoice servers. First let’s add your unique forwarding address. Your unique address is:

Unique address not available. Please open this page using the link provided in the GVoice app Push Settings page.

5-GoogleMailSettings

6-ForwardingSettings

7-AddForwarding

You will be asked to activate the new forwarding address, but do not worry about it. The email will be automatically activated by the GVoice server.


Let’s filter the emails we want to send to GVoice, we don’t want all your mail!

8-MailCreateFilter

Add

txt.voice.google.com OR voice-noreply@google.com

in the “From” filter.

9-Filter

Forward these emails to the forwarding address provided.

10-FilterPart2


Whew! You’re done!

Porting Clockwork Recovery to New Devices

Update/Preface:

It is difficult for me to port recovery for a device I don’t have. So, people can attempt to port it using this guide. However, if you want it done properly, and probably quicker, you can loan the device to me personally at:

Koushik Dutta 2721 1st Ave 507 Seattle, WA 98121

The package must include:

  • The rooted phone.
  • A return packing slip to your address.
  • A signed statement saying: “I, <your name here>, am lending this device, <name of device>, to Koushik Dutta so that he can try to port Clockwork Recovery to the device. I understand that rooting a phone voids the warranty and tampering with the software may render the device nonfunctional. I realize and accept that the phone may not be functional when it is returned. Koushik Dutta is not liable for any damages to the device.”
  • BEFORE SENDING ME THE PACKAGE, CONFIRM WITH ME THAT I AM AVAILABLE TO PORT THE RECOVERY.

It will take around a week, and there are no gaurantees whether I will actually be able to do it (due to proprietary software, locked bootloaders, my schedule, etc). After a week (generally quicker), I will send it back. I’m a trustworthy guy and am well known in the Android community. And I’ve already done this for several loaner devices. Smile So you don’t need to worry about the safety of your precious hardware.

Otherwise, continue on the to the guide!

  • This guide will assume you have some familiarity with doing an Android Build.
  • This guide will work for phones that use a standard Android boot image format. This guide will not work for Samsung phones which use an initramfs.

First, let's check out the CyanogenMod tree. The CyanogenMod repository contains Clockwork Recovery, which is part of a full Android build.

repo init -u git://github.com/CyanogenMod/android.git -b gingerbread

repo sync

make -j4 otatools

Now, use dump_image or dd to dump your recovery or boot image from a running phone and copy it to your computer somewhere.

dump_image boot boot.img

To build Android from source for a new device, you need to set up a board config and its makefiles. This is generally a long and tedious process. Luckily, if you are only building recovery, it is a lot easier. From the root of your Android source directory (assuming you've run envsetup.sh), run the following (substituting names appropriately):

build/tools/device/mkvendor.sh device_manufacturer_name device_name /your/path/to/the/boot.img

You will receive the confirmation "Done!" if everything worked. The mkvendor.sh script will also have created the following directory in your Android source tree:

manufacturer_name/device_name

Now, type the following:

lunch full_device_name-eng

This will set the build system up to build for your new device. Open up the directory in a file explorer or IDE. You should have the following files: AndroidBoard.mk, AndroidProducts.mk, BoardConfig.mk, device_.mk, kernel, system.prop, recovery.fstab, and vendorsetup.sh.

The two files you are interested in are recovery.fstab and kernel. The kernel in that directory is the stock one that was extracted from the boot.img that was provided earlier. For the most part, recovery.fstab will work on most devices that have mtd, emmc, or otherwise named partitions. But if not, recovery.fstab will need to be tweaked to support mounts and their mount points. For example, if your /sdcard mount is /dev/block/mmcblk1p1, you would need the following lines in your BoardConfig.mk:

/sdcard vfat /dev/block/mmcblk1p1

Once the recovery.fstab has been properly setup, you can build the recovery using:

make -j4 recoveryimage

Your recovery can then be found at $OUT/recovery.img. If you are in need of building a fakeflash recovery, you will need to run the following to create the update.zip that hot replaces the recovery:

make -j4 recoveryzip

Once this is done, build, and tested, notify me, "koush", on Github and I can build official releases and add ROM Manager support!

Tip: Run "make clobber" between builds if you change the BoardConfig.mk, or the change will not get picked up.

New ROM Manager Feature - Web Connect

Some people really prefer to browse a forum and learn about a ROM before downloading it. And some developers don't want to go through the trouble of maintaining a ROM Manifest.

What if you could click a link on a forum, in your computer's browser, and it started downloading the ROM... on your phone? Introducing ROM Manager's latest and greatest Premium feature: Web Connect.

Enough talking about it. Let's try it! You must have Froyo!

  1. Get the newest ROM Manager (at least 2.0.2.9).
  2. Click the Menu button and click Web Connect to do your one-time setup.
  3. Choose the Google account you are normally logged in with on your computer.
  4. Done!

Now, click this link on your computer to download Superuser... onto your phone:
Superuser 2.3.6.1.

Cool huh? You a developer and want to add support? Use the following to get a bit.ly link set up to your ROM using Web Connect!

Droid X Recovery (and Droid 2 too!)


Well, this was a bitch.

Caveats:
This is not a *real* recovery. The way this recovery works is by hijacking portions of your boot process during system initialization and starting into recovery instead. So, if you hose your system *COMPLETELY* you will need to SBF. Specifically, if your logwrapper, logwrapper.bin, or hijack binary are missing from /system/bin, you will be screwed.

Do I have to be rooted to run this?
Yes.

So can we now install custom ROMs?
Yes, but you can't replace the kernel or boot image. But really, once you have access to /system, anything is possible. It will just take a little hackery.

How does this work?
When your device boots up, there is a init.rc script in your boot image that runs various components found in /system. The Droid X recovery bootstrap mimics the "logwrapper" binary. The hijacker then looks for "/data/.recovery_mode", and if it finds it, it unmounts /system to prevent android from starting. It then starts up recovery instead.

How do I boot into recovery?
You can manually create the /data/.recovery_mode via a terminal file and simply reboot, and you will be in recovery. Or you can use the handy Droid X Recovery Bootstrap application to reboot into recovery.

What if my phone won't boot? How do I get into recovery without the app?
When the hijacker runs, it will automatically create the "/data/.recovery_mode" file after it finishes. This tells the system that the next time it boots, it should boot into recovery. But, when the system starts, the Droid X Recovery Bootstrap will then delete that file when Android is fully started, to prevent you from booting into recovery. So what does this mean? If you fail to boot, simply pull your battery, and your next boot will be into recovery (unless your /system is *really* hosed, in which case you need to SBF).

How do I fix my phone if I really mess it up?
Use an SBF. Google it. http://twitter.com/b16a2smith/status/21544626803

Why does the Droid X Recovery Bootstrap start on boot?
As mentioned above, it needs to log that your phone booted successfully and recovery mode is not necessary. It also replaces your "adb daemon" with one that has root permissions, allowing for easier usage of the adb command.

Will this work with ROM Manager?
Yep! But you must run the Bootstrap app and leave it installed.

Is this open source?
Yep.
Recovery: http://github.com/koush/android_bootable_recovery
Droid X Bootstrap: http://github.com/koush/DroidXBootstrap
Droid X Hijack: http://github.com/koush/android_vendor_motorola_droidx

OK STOP TALKING, WHERE DO I GET IT?
You can donate and grab it for $2 off the Android Market (search for Droid X Recovery Bootstrap or Droid 2 Recovery Bootstrap), or you can download it for free here:
Droid X Recovery Bootstrap
Droid 2 Recovery Bootstrap

What good are ROMs and Themes without a Recovery?

Vote Koush.

More Progress on Writing Android Applications in Mono

Mono on Android: State of the Union

Having mostly finished up my surprisingly successful ROM Manager and ClockworkMod Recovery, I finally turned my attentions back to androidmono. Though Miguel recently announced the MonoDroid project, there's still room for a open source/hobbyist version. :) (And I need something to work on when I am bored)
When I put the project down a few months ago, I had very rough bindings to the Java API. I recently dumped the approach I took (albeit very cool), in favor of using jni4net. jni4net is a similar project that allows embedding a JVM into Microsoft's CLR, or vice versa. It only took a little bit of tweaking to make it work on Dalvik with Mono (I also hacked off a lot of unnecessary stuff that jni4net provides). So the following file:


Gives you this activity:

(Note: the code above is being displayed from my github repo and may change and leave the image out of date.)
I hacked up a Java/C# project to reflect on the Android SDK jar and create a C# android project that binds to the Java APIs via JNI. So, how it sort of works:
  • Create a class library and start coding up your services and activities.
  • Create a matching Java project (using the Android template as found on github) that uses the same namespace as your C# project.
  • Create "native" method stubs for all the overridden methods on your C#/Java doppleganger types. See here for an example.
  • The native methods get bound to the C# implementations at runtime automagically at runtime.

  • There's still a lot of work left to do: MonoDevelop template and plugin, a tool to create Java dopplegangers for each C# object via reflection, soft debugger support, translating Java's "OnSomeEvent" interfaces into true C# events/delegates, convenence extension methods, support for constructors (a Java constructor can not be "native"), and more. I wouldn't even say this is in Alpha stages yet, but it *works*.

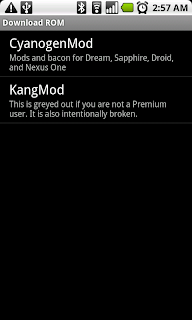
    Adding Your ROM to ROM Manager

    Update: You can now host your ROM on ROM Manager's high speed server for free using ROM Manager Developer Portal! The following instructions are for advanced users that want fine tuned control over their ROM list, and want to utilize some of the advanced features. ROM Share will automatically host and setup your ROM for you in ROM Manager; all you need to do is upload the update.zip!


    First, you'll then want to get yourself listed in the list of developers in ROM Manager:

    To do that, create a JavaScript file that looks like this to describe where to find information about your ROMs:

    Make sure that the URL you provide for your ROM list above will not ever need to change. I don't like doing extra work! Send me that JavaScript you just created. I'll need to add it to the ROM Manager master manifest (which has the list of all the developers and their respective ROM list URLs) before it will show up in ROM Manager. The best way to send it to me is by opening an issue on ROMManagerManifest on Github. If you are super awesome, you can fork, edit the manifest, and send me a pull request. Do NOT email me your manifest.

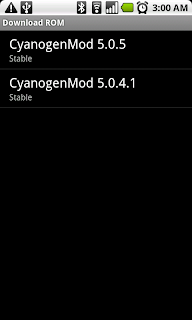
    Now, you'll want to describe your list of ROMs that the user sees when they click you:

    To do that, you need to create another JavaScript file that will live at the URL you provided. It should look something like this:


    And that's it! Your ROM is now listed in ROM Manager!

    But, if you want to use the more advanced features of ROM Manager, such as download mirroring, and ROM customization, check out this manifest:


    Note that you can do cool things that install a sequence of installation zip files. "choices" makes a user choose between several zips (use a URL of "" for no action). Only one of those choices will be installed. You can also have multiple choice selections. And "addons" lets the user choose any number of additional zips to install. You can view my manifest for a full sample.

    Finally, to register your ROM for OTA updates, you need to edit your /system/build.prop in your ROM to include your Developer ID ro.modversion (as mentioned above) so ROM Manager can identify the version of your ROM. This is optional as well, but why not get OTA updates if it's just a couple lines of settings!

    ro.rommanager.developerid=cyanogen
    ro.modversion=CyanogenMod-5.0.5-Droid


    And that's it! Once you upload that file, your ROM will now be available to other Premium users! Good luck, and let me know if you encounter any bugs or need help!

    ROM Manager and Clockwork Recovery Image

    ROM Manager is a Android front end to the Clockwork Recovery image.

    wompa
    Features of the recovery image include Nandroid backup, adb shell, mount USB storage, advanced update.zip options (ignore asserts and signature checks), and file browser (so you can place your zips in subdirectories and organize them).


    The easiest way, by far, to install the recovery is by downloading ROM Manager off the market. But for those that would prefer a manual installation, you can grab the APK and recovery image below.

    ROM Manager (Changelog)

    Don't see your phone? Email me if you want to help me get it working!

    And of course, all the source can be found on Github.

    Working Vendor Configuration for Motorola Sholes (Droid)

    I had a spare Droid (two actually) sitting on my desk at work, so I spent some time hacking up a working vendor configuration for the phone. Took me a few days, but it all worked! I ended up flashing Android 2.1r2 to it.

    Happy Hacking! Head on over to my sholes-open Github repository.

    Klaxon 4.0 for Android

    Klaxon for Android has gone through another rigorous update! This time, I integrated the new Desk Clock from Eclair (Nexus One) into the application. The result is the customizability of Klaxon that users have come to love, with a brand spanking new and polished UI.

    For those of you curious how to get the Weather widget on your desk clock, Google “genie widget” for the third party application found on the Nexus One.

    deskclock alarms

    edit alarm

    Android.dll

    androidmono

    Picture above represents the results of 3 sleepless nights. No, I didn’t rewrite the Android framework. I generated a bunch of proxy classes to access them from Mono though. Rough idea of how it works:

    1. Java application reflects through Android framework SDK jar and outputs an XML file that represents the object model.
    2. C# application generates thousands of code files of said object model. (This is similar to jni4net, but that doesn’t work on anything but Windows).
    3. Tag all the methods with the [MethodImpl(MethodImplOptions.InternalCall)] attribute.
    4. Implement the method calls at runtime with a combination of dynamically created expression tree delegates and mono_add_internal_call.

    The class contents actually have no code, so the total dll size is pretty small (800k). Here’s what the LinearLayout “implementation” looks like:

    namespace android.widget 
    { 
        public class LinearLayout : android.view.ViewGroup
        { 
            public class LayoutParams : android.view.ViewGroup.MarginLayoutParams
            { 
                [global::System.Runtime.CompilerServices.MethodImpl(global::System.Runtime.CompilerServices.MethodImplOptions.InternalCall)] 
                public virtual extern java.lang.String debug(java.lang.String arg0); 
                [global::System.Runtime.CompilerServices.MethodImpl(global::System.Runtime.CompilerServices.MethodImplOptions.InternalCall)] 
                public extern LayoutParams(android.content.Context arg0, android.util.AttributeSet arg1); 
                [global::System.Runtime.CompilerServices.MethodImpl(global::System.Runtime.CompilerServices.MethodImplOptions.InternalCall)] 
                public extern LayoutParams(int arg0, int arg1); 
                [global::System.Runtime.CompilerServices.MethodImpl(global::System.Runtime.CompilerServices.MethodImplOptions.InternalCall)] 
                public extern LayoutParams(int arg0, int arg1, float arg2); 
                [global::System.Runtime.CompilerServices.MethodImpl(global::System.Runtime.CompilerServices.MethodImplOptions.InternalCall)] 
                public extern LayoutParams(android.view.ViewGroup.LayoutParams arg0); 
                [global::System.Runtime.CompilerServices.MethodImpl(global::System.Runtime.CompilerServices.MethodImplOptions.InternalCall)] 
                public extern LayoutParams(android.view.ViewGroup.MarginLayoutParams arg0); 
                [global::System.Runtime.CompilerServices.MethodImpl(global::System.Runtime.CompilerServices.MethodImplOptions.InternalCall)] 
                internal extern LayoutParams(); 
            } 
            [global::System.Runtime.CompilerServices.MethodImpl(global::System.Runtime.CompilerServices.MethodImplOptions.InternalCall)] 
            public virtual extern void setGravity(int arg0); 
            [global::System.Runtime.CompilerServices.MethodImpl(global::System.Runtime.CompilerServices.MethodImplOptions.InternalCall)] 
            protected override extern void onLayout(bool arg0, int arg1, int arg2, int arg3, int arg4); 
            [global::System.Runtime.CompilerServices.MethodImpl(global::System.Runtime.CompilerServices.MethodImplOptions.InternalCall)] 
            public override extern int getBaseline(); 
            [global::System.Runtime.CompilerServices.MethodImpl(global::System.Runtime.CompilerServices.MethodImplOptions.InternalCall)] 
            protected override extern void onMeasure(int arg0, int arg1); 
            [global::System.Runtime.CompilerServices.MethodImpl(global::System.Runtime.CompilerServices.MethodImplOptions.InternalCall)] 
            protected override extern bool checkLayoutParams(android.view.ViewGroup.LayoutParams arg0); 
            [global::System.Runtime.CompilerServices.MethodImpl(global::System.Runtime.CompilerServices.MethodImplOptions.InternalCall)] 
            public virtual extern new android.widget.LinearLayout.LayoutParams generateLayoutParams(android.util.AttributeSet arg0); 
            [global::System.Runtime.CompilerServices.MethodImpl(global::System.Runtime.CompilerServices.MethodImplOptions.InternalCall)] 
            protected virtual extern new android.widget.LinearLayout.LayoutParams generateLayoutParams(android.view.ViewGroup.LayoutParams arg0); 
            [global::System.Runtime.CompilerServices.MethodImpl(global::System.Runtime.CompilerServices.MethodImplOptions.InternalCall)] 
            protected virtual extern new android.widget.LinearLayout.LayoutParams generateDefaultLayoutParams(); 
            [global::System.Runtime.CompilerServices.MethodImpl(global::System.Runtime.CompilerServices.MethodImplOptions.InternalCall)] 
            public virtual extern bool isBaselineAligned(); 
            [global::System.Runtime.CompilerServices.MethodImpl(global::System.Runtime.CompilerServices.MethodImplOptions.InternalCall)] 
            public virtual extern void setBaselineAligned(bool arg0); 
            [global::System.Runtime.CompilerServices.MethodImpl(global::System.Runtime.CompilerServices.MethodImplOptions.InternalCall)] 
            public virtual extern int getBaselineAlignedChildIndex(); 
            [global::System.Runtime.CompilerServices.MethodImpl(global::System.Runtime.CompilerServices.MethodImplOptions.InternalCall)] 
            public virtual extern void setBaselineAlignedChildIndex(int arg0); 
            [global::System.Runtime.CompilerServices.MethodImpl(global::System.Runtime.CompilerServices.MethodImplOptions.InternalCall)] 
            public virtual extern float getWeightSum(); 
            [global::System.Runtime.CompilerServices.MethodImpl(global::System.Runtime.CompilerServices.MethodImplOptions.InternalCall)] 
            public virtual extern void setWeightSum(float arg0); 
            [global::System.Runtime.CompilerServices.MethodImpl(global::System.Runtime.CompilerServices.MethodImplOptions.InternalCall)] 
            public virtual extern void setOrientation(int arg0); 
            [global::System.Runtime.CompilerServices.MethodImpl(global::System.Runtime.CompilerServices.MethodImplOptions.InternalCall)] 
            public virtual extern int getOrientation(); 
            [global::System.Runtime.CompilerServices.MethodImpl(global::System.Runtime.CompilerServices.MethodImplOptions.InternalCall)] 
            public virtual extern void setHorizontalGravity(int arg0); 
            [global::System.Runtime.CompilerServices.MethodImpl(global::System.Runtime.CompilerServices.MethodImplOptions.InternalCall)] 
            public virtual extern void setVerticalGravity(int arg0); 
            [global::System.Runtime.CompilerServices.MethodImpl(global::System.Runtime.CompilerServices.MethodImplOptions.InternalCall)] 
            public extern LinearLayout(android.content.Context arg0, android.util.AttributeSet arg1); 
            [global::System.Runtime.CompilerServices.MethodImpl(global::System.Runtime.CompilerServices.MethodImplOptions.InternalCall)] 
            public extern LinearLayout(android.content.Context arg0); 
            [global::System.Runtime.CompilerServices.MethodImpl(global::System.Runtime.CompilerServices.MethodImplOptions.InternalCall)] 
            internal extern LinearLayout(); 
        } 
    } 

    A year of on and off hacking coming to fruition soon…